DB 구성과 Spring boot로 백엔드를 테스트해보자.
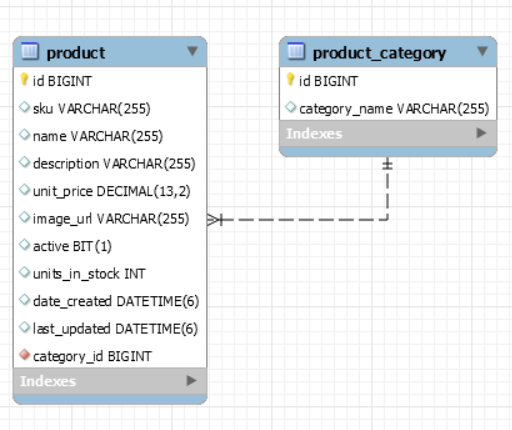
DB 테이블 만들기
CREATE USER 'ecommerceapp'@'localhost' IDENTIFIED BY 'ecommerceapp';

GRANT ALL PRIVILEGES ON * . * TO 'ecommerceapp'@'localhost';

ALTER USER 'ecommerceapp'@'localhost' IDENTIFIED WITH mysql_native_password BY 'ecommerceapp';
유저와 권한을 부여하고 전환한다.
DROP SCHEMA IF EXISTS `full-stack-ecommerce`;

CREATE SCHEMA `full-stack-ecommerce`;
USE `full-stack-ecommerce` ;

CREATE TABLE IF NOT EXISTS `full-sproducttack-ecommerce`.`product_category` (
  `id` BIGINT(20) NOT NULL AUTO_INCREMENT,
  `category_name` VARCHAR(255) NULL DEFAULT NULL,
  PRIMARY KEY (`id`))
ENGINE=InnoDB
AUTO_INCREMENT = 1;

CREATE TABLE IF NOT EXISTS `full-stack-ecommerce`.`product` (
  `id` BIGINT(20) NOT NULL AUTO_INCREMENT,
  `sku` VARCHAR(255) DEFAULT NULL,
  `name` VARCHAR(255) DEFAULT NULL,
  `description` VARCHAR(255) DEFAULT NULL,
  `unit_price` DECIMAL(13,2) DEFAULT NULL,
  `image_url` VARCHAR(255) DEFAULT NULL,
  `active` BIT DEFAULT 1,
  `units_in_stock` INT(11) DEFAULT NULL,
   `date_created` DATETIME(6) DEFAULT NULL,
  `last_updated` DATETIME(6) DEFAULT NULL,
  `category_id` BIGINT(20) NOT NULL,
  PRIMARY KEY (`id`),
  KEY `fk_category` (`category_id`),
  CONSTRAINT `fk_category` FOREIGN KEY (`category_id`) REFERENCES `product_category` (`id`)
)
ENGINE=InnoDB
AUTO_INCREMENT = 1;


INSERT INTO product_category(category_name) VALUES ('BOOKS');

INSERT INTO product (sku, name, description, image_url, active, units_in_stock,
unit_price, category_id, date_created)
VALUES ('BOOK-TECH-1000', 'JavaScript - The Fun Parts', 'Learn JavaScript',
'assets/images/products/placeholder.png'
,1,100,19.99,1, NOW());

INSERT INTO product (sku, name, description, image_url, active, units_in_stock,
unit_price, category_id, date_created)
VALUES ('BOOK-TECH-1001', 'Spring Framework Tutorial', 'Learn Spring',
'assets/images/products/placeholder.png'
,1,100,29.99,1, NOW());

INSERT INTO product (sku, name, description, image_url, active, units_in_stock,
unit_price, category_id, date_created)
VALUES ('BOOK-TECH-1002', 'Kubernetes - Deploying Containers', 'Learn Kubernetes',
'assets/images/products/placeholder.png'
,1,100,24.99,1, NOW());

INSERT INTO product (sku, name, description, image_url, active, units_in_stock,
unit_price, category_id, date_created)
VALUES ('BOOK-TECH-1003', 'Internet of Things (IoT) - Getting Started', 'Learn IoT',
'assets/images/products/placeholder.png'
,1,100,29.99,1, NOW());

INSERT INTO product (sku, name, description, image_url, active, units_in_stock,
unit_price, category_id, date_created)
VALUES ('BOOK-TECH-1004', 'The Go Programming Language: A to Z', 'Learn Go',
'assets/images/products/placeholder.png'
,1,100,24.99,1, NOW());
스키마와 테이블 만들고 insert 쿼리로 데이터 입력

테이블이 생긴다.
스프링부트 설정

사이트에서 생성하고 이클립스에서 불러오기

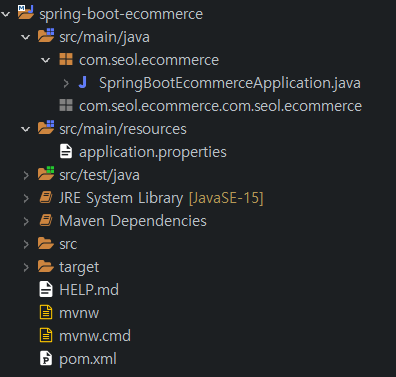
처음 불러 왔을 때 모습
spring.datasource.driver-class-name=com.mysql.cj.jdbc.Driver
spring.datasource.url=jdbc:mysql://localhost:3306/full-stack-ecommerce?useSSL=false&useUnicode=yes&characterEncoding=UTF-8&allowPublicKeyRetrieval=true&serverTimezone=UTC
spring.datasource.username=ecommerceapp
spring.datasource.password=ecommerceapp

spring.jpa.properties.hibernate.dialect=org.hibernate.dialect.MySQL8Dialect

spring.data.rest.base-path=/api
application.properties 파일에 이런 내용 추가
데이터베이스 접속 정보
Entity 생성
package com.seol.ecommerce.entity;

import java.math.BigDecimal;
import java.util.Date;

import javax.persistence.Column;
import javax.persistence.Entity;
import javax.persistence.GeneratedValue;
import javax.persistence.GenerationType;
import javax.persistence.Id;
import javax.persistence.JoinColumn;
import javax.persistence.ManyToOne;
import javax.persistence.Table;

import org.hibernate.annotations.CreationTimestamp;
import org.hibernate.annotations.UpdateTimestamp;

import lombok.Data;

@Entity
@Table(name="product")
@Data
public class Product {
	@Id
	@GeneratedValue(strategy = GenerationType.IDENTITY)
	@Column(name="id")
	private Long id;
	@ManyToOne
	@JoinColumn(name="category_id", nullable= false)
	private ProductCategory category;
	@Column(name="sku")
	private String sku;
	@Column(name="name")
	private String name;
	@Column(name="description")
	private String description;
	@Column(name="unit_price")
	private BigDecimal unitPrice;
	@Column(name="image_url")
	private String imgaeUrl;
	@Column(name="active")
	private boolean active;
	@Column(name="units_in_stock")
	private int unitsInStock;
	@Column(name="date_created")
	@CreationTimestamp
	private Date dateCreated;
	@Column(name="last_updated")
	@UpdateTimestamp
	private Date lastUpdated;
}
@CreationTimestamp와 @UpdateTimestamp는 Hibernate가 처리하는 Annotation이다.
하지만 무엇을 개발자대신 처리하는지 확실하지 않으니 자세한 공부가 필요하다.
package com.seol.ecommerce.entity;

import java.util.Set;

import javax.persistence.CascadeType;
import javax.persistence.Column;
import javax.persistence.Entity;
import javax.persistence.GeneratedValue;
import javax.persistence.GenerationType;
import javax.persistence.Id;
import javax.persistence.OneToMany;
import javax.persistence.Table;

import lombok.Data;

@Entity
@Table(name="product_category")
@Data
public class ProductCategory {

	@Id
	@GeneratedValue(strategy = GenerationType.IDENTITY)
	@Column(name="id")
	private Long id;
	@Column(name="category_name")
	private String categoryName;
	@OneToMany(cascade=CascadeType.ALL, mappedBy="category")
	private Set<Product> products;

}
REST API
| HttpMethod | Path | CRUD |
| POST | /products | Create |
| GET | /products | Read list of products |
| GET | /products/{id} | Read single product |
| PUT | /products/{id} | Update |
| DELETE | /products/{id} | Delete |
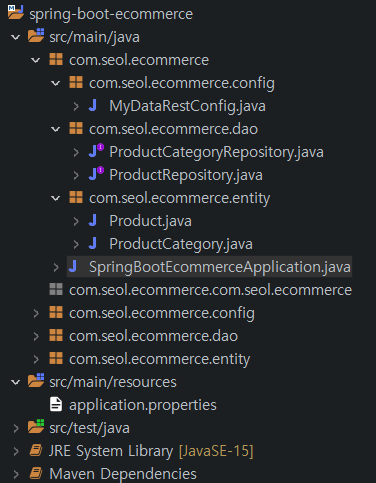
dao 패키지와 인터페이스를 생성한다.
Repository를 만든다.
package com.seol.ecommerce.dao;

import org.springframework.data.jpa.repository.JpaRepository;

import com.seol.ecommerce.entity.Product;

public interface ProductRepository extends JpaRepository<Product, Long>{


}
package com.seol.ecommerce.dao;
import org.springframework.data.jpa.repository.JpaRepository;
import org.springframework.data.rest.core.annotation.RepositoryRestResource;
import com.seol.ecommerce.entity.ProductCategory;
@RepositoryRestResource(collectionResourceRel = "productCategory", path = "product-category")
public interface ProductCategoryRepository extends JpaRepository<ProductCategory, Long>{
}
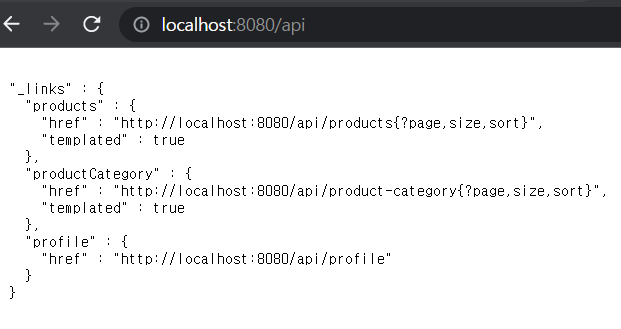
collectionResourceRel은 JSON 엔트리 이름이다.
path는 /product-category 이다.


REST API Read only
REST API의 모든 메서드를 사용하고 싶지 않고 읽는 것만 하고싶다.
두 가지 방법이 있는데
1. Spring Data REST를 사용하지 않고 @RestController를 구성하여 @GetMapping을 정의하는 방법. 이 방법은 Spring Data REST의 페이징이나 소트 기능 사용 못 함
2. Spring Data REST 를 사용하는 방법. POST, PUT, DELETE 기능을 끈다.
package com.seol.ecommerce.config;

import org.springframework.context.annotation.Configuration;
import org.springframework.data.rest.core.config.RepositoryRestConfiguration;
import org.springframework.data.rest.webmvc.config.RepositoryRestConfigurer;
import org.springframework.http.HttpMethod;
import org.springframework.web.servlet.config.annotation.CorsRegistry;

import com.seol.ecommerce.entity.Product;
import com.seol.ecommerce.entity.ProductCategory;

@Configuration
public class MyDataRestConfig implements RepositoryRestConfigurer {

	@Override
	public void configureRepositoryRestConfiguration(RepositoryRestConfiguration config, CorsRegistry cors) {
		HttpMethod[] theUnsupportedActions = { HttpMethod.PUT, HttpMethod.POST, HttpMethod.DELETE };

		//Product의 HTTP 메소드 금지 : PUT, POST, DELETE
		config.getExposureConfiguration()
				.forDomainType(Product.class)
				.withItemExposure((metdata, httpMethods) -> httpMethods.disable(theUnsupportedActions))
				.withCollectionExposure((metdata, httpMethods) -> httpMethods.disable(theUnsupportedActions));

		//ProductCategory의 HTTP 메소드 금지 : PUT, POST, DELETE
		config.getExposureConfiguration().forDomainType(ProductCategory.class)
				.withItemExposure((metdata, httpMethods) -> httpMethods.disable(theUnsupportedActions))
				.withCollectionExposure((metdata, httpMethods) -> httpMethods.disable(theUnsupportedActions));


	}

}

config 패키지를 만들고 class를 만든다. 인터페이스를 구현한다.


Postman으로 테스트하면 405 오류가 나면서 거절된다.
'컴퓨터공학 > Boot & Angular' 카테고리의 다른 글
| Angular> Online Shop Template 적용 (0) | 2022.01.23 |
|---|---|
| Angular> Front end - Product List (0) | 2022.01.22 |
| Angular> Bootstrap 적용, 조건문, 서식 (0) | 2022.01.16 |
| Angular> 기본 작동 방식 (0) | 2022.01.15 |
| Angular> Create Project (0) | 2022.01.13 |


